Never Fail Pie Crust

“Never Fail Pie Crust” is the actual title of this recipe. It comes from my favorite source of all good things: church cookbooks! Specifically, it is from the Centennial Cookbook of St. John Lutheran Church in Hanover, Iowa. I credit the ladies (Mrs. Kenneth Schmidt and Mrs. Wayne Radke) who submitted this recipe for all of my crust-making success. I cannot blame them for my failures because it was really only when I made substitutions based on other pie makers’ recommendations that I had disappointment and even failure.
Secret to Flaky Pie Crust: Lard
There is one secret to this recipe and that, my friends, is LARD. I use lard in two recipes, pie crust and a particularly delicious cookie that will probably make its appearance around Christmas. When I was first married, I started making pie without the ability to ask my mom for help (well I did call her a few times). I didn’t know you could buy lard in the grocery store. I thought it only came from the butcher (farm girl). I tried substitutions. I have never been so frustrated with the effort of rolling out a pie crust! Once I explained my problem to my mom and she, very politely, told me that I could indeed buy it at the store, my frustration ended.
I love lard.
therapy
I have seen many food demonstrators and food network stars on television who say you should just save yourself the trouble and buy your pie crusts. I have no problem with that and I will not turn my nose up to a pie made with a purchased pie crust. That would be crazy. However, I like the process. It’s relaxing to me. Okay so maybe not the first couple of times but it is now.
tips & tricks
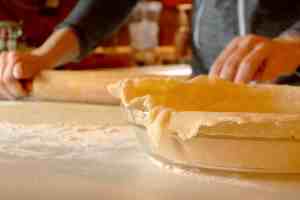
Rolling out pie crust is usually the thing people struggle with the most. The tips here are:
- use enough flour on the cupboard and rolling pin to avoid sticking
- work the dough ball into a flat disc by hand before ever starting to roll it out
- flip the crust over at least twice to get more flour between it and the countertop
- be gentle in your rolling
Place the flattened disc (about 6″ in diameter) onto the floured surface and place the rolling pin across the center of the disc and begin rolling gently away from you. Pick the rolling pin up and roll again at an angle and then again at the opposite angle. Flip the dough, adding more flour to the cupboard. Continue rolling in different directions until the dough is an even thickness and about 10″ in diameter. Add more flour to the rolling pin whenever the dough begins to stick to it. Pick up the crust, scatter more flour under it, flip it over and begin rolling again until it is even in thickness and about 12″ in diameter. Hold the pie plate over the circle. If the dough extends a couple inches beyond the edge of the plate, no more rolling is needed. If not, roll a few more times, thinning it out a bit more.
Gently run the thin spatula and some of the excess flour between the crust and the countertop to loosen it. Set the rolling pin gently on top of the crust and use the spatula to lift half of the crust up and over the rolling pin. Then, grab the rolling pin and lightly wrap the rest of the crust onto it. Transfer it over the pie plate, letting one edge drop so it overlaps the outside of the plate. Unwrap the rest slowly so adjustments in positioning the crust can be made. Gently work the crust down into the pie plate so no air pockets remain.
If the crust tears it is not a crisis. Wet your fingers with a little water, reposition the torn pieces to overlap slightly and press them together using the water as a paste.

Fill the bottom crust with your pie filling and roll out the top crust. It does not need to be quite as big as it does not have to cover the inside of the plate. Just measure it again by holding the pie plate over it to make sure it reaches the edges. Dip your fingers in the water and lightly coat the outer-edge of the bottom crust to help hold the bottom and top crusts together during baking. Transfer the top crust as before and lay it on top of the filled plate and gently press the two crusts together along the edge.

There are many ways to pinch or seal the crusts. I like the pinch method as shown in the video. Many people use a fork to press them together or various pinching methods. The important thing is to make sure the two crusts are well sealed to keep the filling from oozing out. Sprinkle a little water and then sugar on the top crust and cut small slits with a knife to release the steam during baking.
Follow the baking instructions of the filling recipe. Typically, I will bake a double-crust pie for 10 minutes at 400 degrees and then reduce the temperature of the oven to 350 degrees and continue baking for 40-50 minutes or until the filling is bubbling a little through the slits in the top crust.

If you are still feeling intimidated, maybe it would help to read about one of my worst pie failures: Cherry Pie Soup. Give yourself a break and try this Never Fail Pie Crust recipe.
“Never” is a long time. Failing is a part of the learning process. Pie is a process. Pie is worth it.
Just don’t try it for the first time when you are hosting company for dinner.
After all, it might just turn out so well you won’t want to share!
Never Fail Pie Crust
Ingredients
- 3 cups all-purpose flour + extra for rolling
- 1 teaspoon Salt
- 1 egg
- 1 teaspoon white vinegar
- 5 tablespoons cold water + extra for sealing the crusts
- 1 cup lard
- sugar for sprinkling on top
Instructions
- Lay out and measure all of your ingredients, a pie plate, a large bowl and utensils.
- Clear a cool cupboard (i.e. not next to a hot stove if possible) for rolling out the dough and set a bowl with a cup of flour in it, a bowl with a bit of cold water, your rolling pin, pie plate and a long, flat, skinny metal spatula close to your rolling area.
- Sprinkle 1/3 of a cup of flour on the cupboard and roll the rolling pin through it to coat.
- In the large bowl, mix together the flour and salt.
- Crack the egg into a small bowl and add the vinegar and 5 tablespoons of cold water; beat gently to combine.
- Add the lard, in chunks, to the flour and salt and gently begin working it together with your hands until it forms large crumbles.
- Pour in the egg mixture and continue working gently with your hands just until the dough comes together into a rough ball.
- Turn the ball out onto the floured surface and roll in the flour just enough to keep it from sticking to your hands (it will stick a little but you should be able to work with it).
- Divide dough into three equal portions.
- At this point, you can freeze the dough and save time for when you want to make a pie on another day. Just wrap each portion tightly in plastic wrap and seal tightly in a ziploc bag and freeze.
- When you are ready to make the pie, take one or two portions out (depending on if you are making a single- or double-crust pie.
- Allow dough to thaw completely and come nearly to room temperature.
- Roll each disc into a circle to fit the plate you have chosen.
more pie posts
Amazing Apple Pie Filling Recipe
Pumpkin Pie
Thanksgiving Humble Pie

Yum